 Yes G and I are one of those sappy couples that got engaged on Valentine's Day. I never was a fan of sap, but really, this kind of sap was quite all right for me. So, this year I wanted to be nice and sappy and make one of our favorite desserts, tiramisu. Tiramisu is yum. Tiramisu is comfort dessert. Tiramisu can be made with store-bought ladyfingers, but why use those, when you can make your own fresh ones at home with loads of egg whites, yolks, a piping bag and whipping utensils?
If you want more information about this wonderful dessert, you can check out this entry about Tiramisu at Wikipedia, they also have an informative entry about LadyFingers.
So, to begin your tiramisu, you will need to make (or buy) some ladyfingers (I chose to make them because well, I'm a bit nutty and I like the fresh ones). There is no shame in buying these already made:
Ladyfingers: (I decided to make more of a tiramisu cake then just plain ole tiramisu, so this will make 2 piped layers of lady fingers and then enough fingers to line the outside of the "cake")

8 egg whites
8 egg yolks
7 1/2 ounces granulated sugar, divided in two parts, one being 3 ounces and one being 4 1/2 ounces
6 ounces sifted cake flour (I confess to having no cake flour on hand, so I am using all-purpose, shhhh don't tell the lady finger gods)
________________________
-Preheat oven to 425F.
-Line a few sheet pans with parchment. If you are going to to make this like a cake you will want to pipe circles of the ladyfinger batter the size of your springform pan (or a little smaller actually) by tracing the pans onto the parchment and placing that parchment on the sheet pans marked side down (you don't want ink in your lady finger cake..well, you might, but I don't recommend it). Have a piping bag with a large plain tip ready to go.
-In the bowl of a mixer fitted with a whipping attachment (Or you can whisk by hand if you are strong of wrist, I whisked these by hand because, well, as I said earlier, I'm just plain nuts) place the egg yolks and 3 ounces of sugar. Whip on high until the mixture is thick and light lemon colored. This is called a "cold sabayon".
 -Place the egg whites in the bowl of a mixer with a whip attachment (I used my mixer for these, cause I'm not that crazy, my arm was unhappy with me after doing the sabayon..geesh, I'm out of practice). Begin whipping the whites until they start to become a little foamy and then start to slowly add the 4 1/2 ounces of sugar. Whip a bit between each addition. You want your whites to be a medium peak, like so:
 -Take 1/4 of the whipped egg whites and fold them into the yolk mixture to lighten it (this is called "sacrificing" always sounds neat to "sacrifice 1/4 of the whites"). Gently fold the remaining whites into the yolks until it is just about blended, then add the sifted flour and fold until it disappears into the batter.
 -Fill your piping bag with the mixture and pipe out the cake rounds (I'm doing 2 thin ones)

and then pipe out your fingers (you want them to be fairly even in length as they will be used to decorate the outside of the cake). Pipe the rounds so they are about 1 inch smaller than the diameter of your springform pan. You can just make all fingers if you want to go for a more traditional tiramisu layered in a square pan.
 -Lightly sprinkle the tops of the ladyfingers with powdered sugar, and bake for about 5 to 10 minutes at 425f.
-Cool on a rack and if not using the same day, store in an airtight container with parchment paper between the layers.
*Please note, I had forgotten that my original recipe was more of a production recipe (I haven't made these in ages) so the amount of batter I have is insane. I have halved the recipe here for you, so don't worry if your batter appears to be a bit less than what I have. I have ladyfingers coming out of my ears.....I'll be freezing them. No wonder my arm hurt from whisking the yolks. Don't be surprised if you see them show up in the future*
Now that you have your dainty little ladyfingers, you can make the tiramisu soaking syrup and the wonderful loverly insides.
Soaking syrup for the Ladyfingers:
2 cups of coffee or espresso (I had espresso powder on hand, so I made 2 cups of it)
1/2 cup sugar
1/3 cup Rum (some people use marsala in the syrup, some people use rum, some people use other things....depends on how you are feeling or what you have on hand)
________________
-Mix these three together and if you feel the need to adjust sugar amounts or other amounts, do so. Bring to a boil and then reduce heat to a simmer and allow to simmer until the mixture is reduced by about 1/4. Place in a shallow container for dipping if you are using all finger shaped ladyfingers , or in something else if you are using ladyfinger rounds (really like a sponge cake) and will be brushing on the syrup.
And now for the mascarpone goodness...
Tiramisu Filling (I made a double batch of this because I was being very enthusiastic, the single batch listed here should be plenty)

3 large eggs, separated
3/4 cups sugar
1 container mascarpone cheese (16 ounces or about 2 cups)
1 cup heavy cream
2 Tbsp orange liqueur (you don't have to add liqueur to the filling, I just like the slight citrus touch it gives...you could also add marsala wine, or rum, or whatever you feel like adding..)
______________________
-Beat the yolks and 1/2 cup sugar by hand -or with your mixer and a whip attachment- until the yolks are thick and light in color (just like you did for the ladyfingers).
-Add the mascarpone to the yolk mixture and beat until just blended.
-Whip the heavy cream and liqueur (if you are adding booze) in a chilled bowl by hand or machine until it holds soft peaks.
-Whip the egg whites in your mixer with the whisk attachment until they are just foamy and then slowly add the remaining 1/4 cup of sugar while whipping on high speed. You want medium peaks again, as for the ladyfingers.
-Fold the heavy cream into the mascarpone and yolk mixture, sacrificing 1/4 of it first to lighten and then gently folding in the rest. Then fold the whites into this mixture.
*the filling does have raw eggs in it, so if this bothers you, there are other recipes you can find online that use no eggs*
Begin Assembly.
Springform mold: Take the first cake layer you piped and place it in the bottom of the spring form mold. Place a ring of ladyfingers around the edge of the pan.
 Brush the cake layer with the coffee syrup until it has had a fairly good soaking and spread 1/3 of the tiramisu filling over the top. Repeat this with the remaining layers ending with a layer of tiramisu filling.
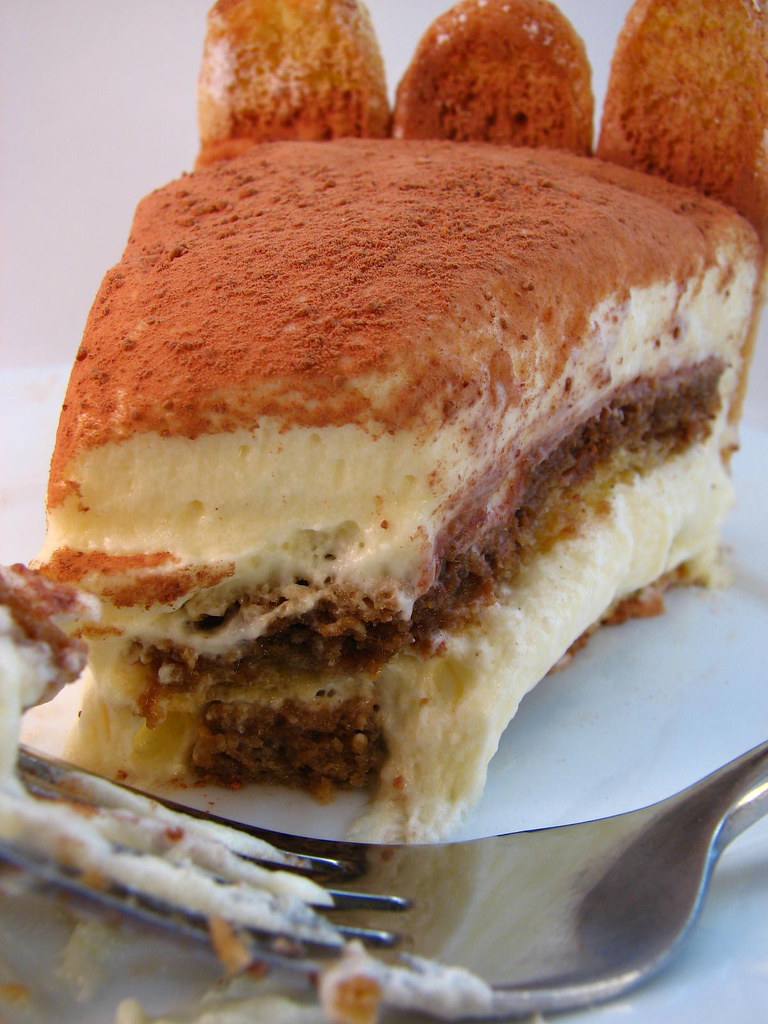
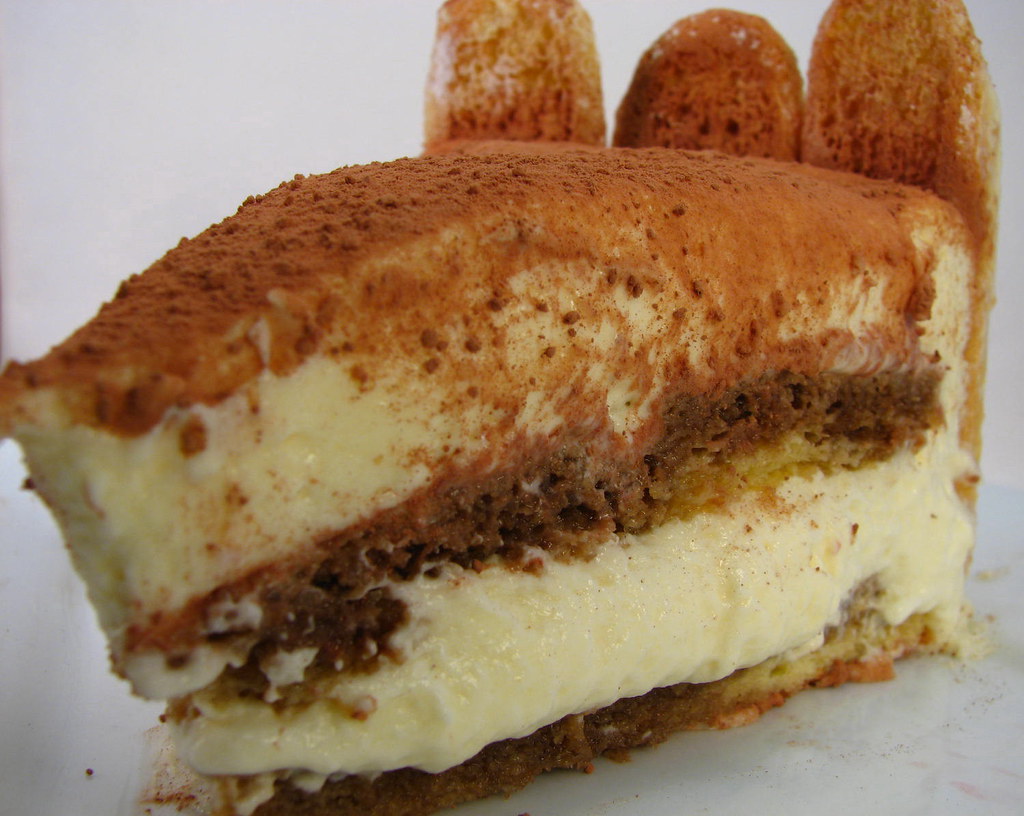
Generously sift cocoa powder over the top, gently cover and chill for 6 hours or overnight to allow it to set up.

 Decorate with chocolate shavings or strawberries or however you would like. This is not really a firm set, so if you go this route, take care when you slice the "cake" as it will be soft, but not unmanageable. I skipped the berries and chocolate shavings for my presentation, however I think a few chocolate shavings would be really really nice. And maybe a raspberry or two as well.
Layers of ladyfingers: dip each ladyfinger into the coffee syrup and place in the bottom of a square pan. Cover the layer of fingers with half the mascarpone mixture, do one more layer of ladyfingers, one more layer of mascarpone. Sift cocoa powder over the top and allow to chill for 6 hours to overnight.
Enjoy!
Happy Baking, and Happy Valentine's Day everyone!
Technorati Tags:tiramisu, valentine's day, baking, dessert, sweets, foodporn, food porn, yummy, recipe
Generated By Technorati Tag Generator